This program is a hack to the There client. There are several issues that WILL arise if you install this on your computer. INSTALL AT YOUR OWN RISK. The issues that have been reported are: 1)in-client browser windows fail to load after about 15-20 minutes of using the GPS; and 2) some in-client text boxes (saving a favorite place, donating money, etc; NOT IM windows) don't accept text entry after about 15-20 minutes of using the GPS. These problems happen in the client even without the GPS hack, are related to a memory leak in the There client program. The GPS hack only decreases the time before these issues arise in your client. Once these problems have started to occur, the only way to fix them is to exit and re-start the client. Recent versions (2.5 and greater) have some changes in the underlying code to help minimize these issues. Tests have shown the problems show up after 90 minutes to 2 hours of using the GPS in client. It is possible to avoid the problems entirely by running the GPS in an external window. To do this you will need to run There as a window instead of full-screen, once the client has loaded be sure to close the GPS if it's open and press Control-L, and then simply open the compass.swf file by double clicking (I advise placing a copy on your desktop for easy access). The only problem with running the GPS in a seperate window is the speed display loses accuracy and bounces around a lot.
I would like to thank Korrupt for laying the groundwork for this, and other, user created applications for There. I'd also like to thank Bedicus and Iay for their help and advice as I've added new features. And finally, I'd like to thank Mushh and all the other GPS_Enthusiasts for all the help mapping and double checking the No-Fly zones.
V3.1 - I'd like to thank Majandi for helping me get data to add the new islands to the map.
You can download the latest version of the patch here.
Download the file and copy the compass.swf, SavedPlacess.xml, and configVars.txt files to C:\Program Files\There\ThereClient\Resources\compass. You may want to rename the compass.swf file already in the directory. But, if you forget, the original There compass file is included as old_compass.swf in case you want to revert to that version. You do not need to restart the There application if you installed the new compass.swf file while There was running.
V3.1 - To make things a bit easier for those who use the Bedican Compass to update their version of the GPS, I've included the full GPS as gps.swf, as well as compass.swf. If you use the Bedican Compass, do not copy the compass.swf file from the GPS .ZIP file into your Resources\compass directory, instead, copy the gps.swf file.
V3.1 - If you have modified your SavedPlaces.xml file to add your own locations, you may not want to copy the included SavedPlaces.xml file. Because I've added the new maps to this version, I added a saved trace for each of the islands. If you've customized your saved traces, you will want to either move your changes to the new file or move the changes in the new file to your customized file.
There are several panels available in the GPS package. The default Alpha level (transparency) for the entire GPS is 0 (fully transparent). The panels are shown here with 100 Alpha (opaque) to show the real size of each panel. It is now possible to set several startup options for the GPS. These include transparency, coordinate display format, which panels are open, and what order they are in. Click Here for information on changing the default startup options.
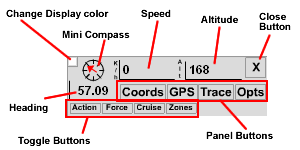
The Main panel is the default display when the GPS is open.
The Mini Compass shows the direction you avatar is currently facing. North is up, East is right, South is down, and West is left.
The Heading display shows the numerical heading of your avatar. 0 is North, 180 is South, positive values are West, negative are East.
Your Speed is displayed in Kilometers per Hour.
Your Altitude is displayed in Meters above sea level.
The Close Button closes the GPS.
The Change display color button toggles the color of the fields and some of the lines between black and white for easier viewing in different lighting or against different backgrounds when the background is transparent.
The Toggle Buttons turn on and off different options within the There client. The Action button will toggle the 'Default to Action Mode' option. The Force button will turn your Forcefield on and off. The Cruise button switches Cruise Control on and off. And the Zones button toggles the display of No-Fly zones on the GPS maps.
The Panel Buttons open and close the various other panels: Coordinates, GPS, Trace, and Options. The panels will open below the Main panel. Click once to open the panel, click the same button again to close it. The panels can be opened in any order, and will open below any opened windows. The can also be closed in any order, and any panels that remain open will adjust their position so all the panels are connected.
The Coordinates panel shows your avatar's location in a bit more detail, as well as having a larger, easier to read compass.
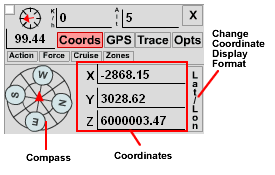
The Compass shows the direction you avatar is currently facing.
The Coordinates show you exact locaton. There are three(3) modes of display: X/Y/Z (the default), Latitude/Longitude, and Distance. X/Y/Z mode shows your location as reported by There. Lat/Lon mode shows the latitude and longitude of your location in degrees, minutes, and seconds. It also changes the Heading display in the Main panel to show your heading using more 'traditional' values (0 is North, 90 is East, 180/-180 is South, -90 is West). Dist mode shows your distance in meters from 0,0,6000000 by default, or your distance from an active Trace point(see below). The different display modes are toggled by the Change Coordinate Display Format button and cycle from X/Y/Z -> Lat/Lon -> Dist -> X/Y/Z ...
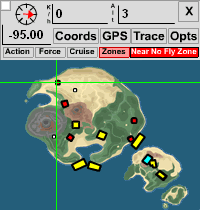
The GPS panel displays a minimap of the island your are currently on or near, a scale map of the 'main' islands if you're not close to one of the islands, or a 'global' map if you're WAY off the beaten track. The intersection point of the green lines marks your current position. When you press the Zones button, it will display the locations of No-Fly zones on the current map. The zones are color coded based on height. Red zones extend from the ground to between 1000 and 2000 meters into the sky. Yellow zones extend from the ground up to 250 to 500 meters. The white zones very small zones that are around the 'pools' locations. The one blue zone is different in that it doesn't extend from the ground. It is at the top of the mountain, so you can fly under it on the lower slopes of the mountain. When you get close to one of the No-Fly zones, the GPS will automatically display the zones overlay, as well as display a warning message in the Main panel.
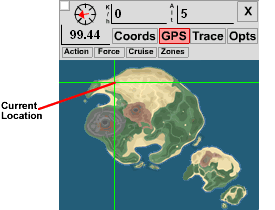
Note: The maps are as accurate as I can make them. However, due to the large scale of the world and the small size of the map images, there are bound to be some times when the position indicated on the map isn't your EXACT location in-world. It'll be pretty close, though.
The Trace panel allows you to establish a "Trace point" based on X/Y/Z coordinates.
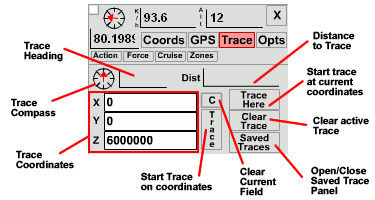
The Trace Compass shows the direction to the Trace point relative to your avatar's current heading. Up means it's ahead of you, down means it's behind you, etc.
The Trace Heading shows the absolute numerical heading of the Trace point from your current location.
The Distance to Trace field shows the approximate distance to the Trace point (though it doesn't take into account any difference in altitude).
The Trace Coordinates boxes display the X/Y/Z coordinates of an active Trace. You can also click on them to enter coordinate values to start a Trace on any coordinates. Clicking the 'C' button will clear the current coordinate field. Clicking the 'Trace' button will start a Trace on the values in the coordinate text boxes.
Trace Here will start a trace on your current location.
Clear Trace will cancel an active trace and reset the Trace Coordinates to 0,0,6000000.
Saved Traces opens the Trace Presets panel.
When you start a Trace point, the "T" in the Trace button on the Main panel will turn red.
The Trace Presets panel has several buttons that will start a Trace point for popular locations. There are six pages of eight buttons, and each is customizable. To change the saved Trace information, you will need to edit the SavedPlaces.xml file that came with the GPS. The red numbers show the order of the buttons relative to the locations in the SavedPlaces file.
Click Here for detailed instructions on how to modify your saved Trace locations.
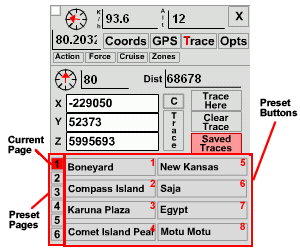
Just click a button to start a Trace point for the location listed. When you close the Trace panel, the Trace Presets panel will close as well.
The Options view allows you to adjust several settings for the GPS system.
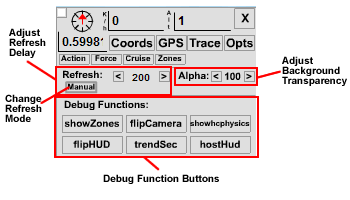
The Adjust Background Transparency option lets you change the alpha level (transparency) of the background of the GPS system. The range is between 0 (completely transparent) and 100 (completely opaque). The default value is 0, and is reset when the GPS is started. The decrease button [<] lowers the value by 10. The increase button [>] raises the value by 10.
The Change Refresh Mode button toggles between Automatic and Manual refresh modes. When in Automatic refresh mode, the GPS refreshes about 5 times per second. In Manual refresh mode, the GPS only refreshes data when you click on the GPS. You can click anywhere your cursor turns into a hand, except on a button, to manually refresh the data. Anywhere you can drag the GPS, clicking will cause a refresh.
In Version 3.1, I've returned the Adjust Refresh Delay option. This allows you to slow down how often the GPS gets data about your location. The number represents how many miliseconds (thousandths of a second) the GPS waits before getting your location data. The default setting is 1000, which means the GPS is updating your location information every second. While this number is below 1000, down to 200 (1/5 second delay), pressing the increase/decrease buttons will adjust the setting by 100. When the value is over 1000, pressing the increase/decrease buttons will add/subtract 1000 from the setting.
The Debug Function buttons allow you to easily change several "Environmental Variables". Turning these options on can degrade the performance of your There client, and potentially crash it. By default, the GPS turns all these settings Off every time it is opened. In Version 3.1, I changed this function to make the GPS more compatible with the Bedican Compass. The GPS will no longer set all your Debug settings Off when it's opened.